 0
0
 0
0
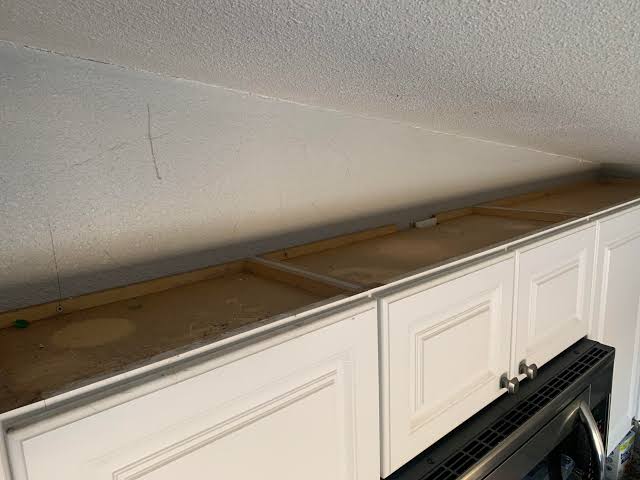
The tops of kitchen cabinets are easy to forget because they sit above normal eye level. They are not handled like cabinet doors, used like countertops, or exposed to obvious spills. Yet when someone finally reaches up to clean them, the surface may feel surprisingly sticky beneath a layer of dust.
That buildup usually has little to do with direct contact.
Cooking releases tiny amounts of oil and moisture into the surrounding air. Warm air carries some of that residue upward, where it settles on high horizontal surfaces. Ordinary household dust then sticks to the oily film instead of remaining loose.
Over time, cabinet tops can develop a heavier coating than surfaces that people touch every day.
Understanding how that layer forms makes it easier to decide where to clean, what method to use, and how to keep the problem from becoming difficult again.
Cooking Residue Does Not Stay Beside the Stove
Visible splatter is only the most obvious form of kitchen grease.
Frying, sautéing, roasting, and other cooking methods can release much smaller droplets into the air. Warm air moves those particles upward, while normal airflow can carry them beyond the immediate cooking area.
Some may settle on:
- Cabinet tops
- Upper shelving
- The top of the refrigerator
- Range-hood exteriors
- Light fixtures
- Nearby walls
This explains why a cabinet that nobody touches can still become oily.
The lack of regular contact can actually make the problem more noticeable over time because the surface remains undisturbed long enough for several layers to accumulate.
Dust Changes a Thin Film Into Heavy Buildup
A fresh oily film may be almost invisible.
The surface becomes much harder to clean once ordinary household dust lands on it.
Hair, textile fibers, fine soil, paper particles, and other airborne debris stick to the grease rather than blowing away or being removed by a light dusting.
Layer after layer gradually produces a coating that feels tacky or rough.
This combination also explains why cabinet-top buildup often looks different from ordinary dust elsewhere in the home.
A bookshelf may need little more than dust removal. A cabinet top may require both dry-debris removal and treatment of the oily layer underneath.
Those are two different cleaning stages.
Distance From the Stove Can Reveal the Grease Pattern
Not every cabinet top will necessarily be equally dirty.
The sections closest to the cooking area often collect heavier residue, while cabinets farther away may hold mostly loose dust or a much lighter film.
Compare several locations.
If the cabinet directly beside the range is sticky while a cabinet across the room is only dusty, there is no reason to treat both with the same cleaning strength.
This comparison can also help show how far airborne cooking residue is travelling.
A household using Puget Sound Cleaners as part of its regular home-cleaning routine can treat these upper surfaces according to actual buildup rather than assuming every high cabinet needs identical attention during every visit.
The condition of the surface should determine the workload.
The Range Hood Reduces Grease but Does Not Eliminate It
A range hood can capture part of the airborne residue produced during cooking.
It does not create a sealed barrier around the stove.
Its performance depends on several factors, including design, installation, operating settings, filter condition, and how much cooking is taking place.
Some fine particles may still move around the sides or front of the cooking zone.
Follow the manufacturer’s instructions for operating the hood and maintaining its filters.
If grease is especially heavy around the hood exterior or nearby cabinets, inspect whether the filter maintenance schedule has been neglected.
That does not automatically mean the ventilation system is defective. It simply gives you another clue about where cooking residue is concentrating.
Open Space Above Cabinets Acts Like a Hidden Shelf
Cabinets that stop below the ceiling create broad horizontal ledges.
Unlike countertops, those surfaces may go months without being inspected.
Objects stored on top make the area even more complicated.
Baskets, cookware, decorations, or artificial plants create additional edges and undersides where grease and dust can collect.
Remove movable objects before cleaning instead of wiping around them.
Inspect their bases too.
A clean cabinet top can become dirty again immediately if an oily basket or dusty decorative item is placed straight back onto it.
Treat the stored objects and the surface beneath them as one small cleaning zone.
Remove the Loose Layer Before Addressing the Grease
A thick cabinet-top coating often contains a surprising amount of dry material.
Remove that loose dust before applying moisture.
A suitable vacuum attachment or dry microfiber method can work, depending on the surface and access.
Capture the debris rather than brushing it over the cabinet edge.
Otherwise, the kitchen counters and floor below may receive much of the dust that was just removed from above.
Once the loose material is gone, the actual greasy film becomes easier to see and treat.
This is the only stage where dry-dust removal needs to be the main focus. Later steps can concentrate on the residue underneath.
Match the Cleaner to the Cabinet Material
Cabinet construction varies.
The visible doors may have one finish while the top surface is less protected or made from a different material.
Painted wood, laminate, veneer, coated composite materials, and finished timber may respond differently to moisture and degreasers.
Before treating a broad area, identify the surface as accurately as possible.
Follow manufacturer care guidance where available.
If the material or finish is uncertain, test the cleaning method in an inconspicuous spot.
Watch for:
- Dulling
- Color change
- Swelling
- Finish transfer
- Surface softening
Removing grease is not useful if the process damages the cabinet underneath.
Give Old Grease Time Rather Than More Scrubbing Pressure
Older oily residue may not release immediately.
Using more physical force is not always the safest answer.
Apply an appropriate product in the amount directed and allow any recommended contact time before wiping.
That can reduce the amount of scrubbing required.
Several controlled passes may be safer than one aggressive attempt, especially on painted, veneered, or finished surfaces.
Avoid saturating cabinet seams or unfinished edges.
The goal is to loosen the oily layer gradually without forcing moisture into materials that may react poorly to it.
Clean Cabinet Tops Before Finishing Lower Kitchen Surfaces
High-level cleaning can create new debris below.
Dust may fall from cabinet tops. Small particles can drop from stored objects. Cleaning cloths may loosen residue along elevated edges.
For that reason, cabinet tops should usually be handled before the final cleaning of lower counters and flooring.
The same logic applies when the buildup extends to refrigerator tops, open shelving, or accessible light fixtures.
If several of those overhead surfaces need attention together,professional house cleaning services seattle can fit into the cleaning plan at the point where the kitchen needs one coordinated top-to-bottom sequence rather than several unrelated spot cleanups.
The benefit of that order is practical: anything loosened above can be collected during the later countertop and floor passes instead of falling onto areas that were already finished.
Include the Refrigerator Top in the Same Inspection
The top of a refrigerator often develops similar residue.
It sits high in the room, may be close to the stove, and is easy to ignore during ordinary cleaning.
Remove items stored there before starting.
Inspect whether the surface holds loose dust, oily film, or both.
Clean the accessible exterior according to the appliance manufacturer’s guidance.
Avoid allowing liquid to run into vents, seams, electrical areas, or controls.
Checking the refrigerator during the same session helps prevent one heavily coated high surface from being left beside freshly cleaned cabinet tops.
Treat Light Fixtures as a Separate Material Problem
Pendant lights and other kitchen fixtures can also collect airborne grease.
They should not automatically receive the same cleaning method used on cabinets.
Turn the light off and allow bulbs to cool.
Then identify the exterior material.
Glass, painted metal, unfinished metal, plastic, and decorative coatings may require different care.
Keep liquid away from electrical components and do not dismantle a fixture merely to chase minor hidden residue.
The goal is to clean safely accessible buildup while respecting the fact that the fixture is electrical equipment, not another cabinet surface.
Use Fresh Cloths for the Finishing Stage
Grease can saturate a cleaning cloth quickly.
Once that happens, the cloth may begin redistributing the oily mixture instead of lifting it.
For heavier jobs, separate the main cleaning cloth from the finishing cloth.
The first handles the greasy residue.
The second removes remaining product or light film, following the cleaner directions.
If a final damp wipe is recommended, use clean material for that step.
Then allow the surface to dry before judging the result.
A tacky feeling after cleaning may sometimes come from leftover product rather than kitchen grease, so evaluate the surface only after the finishing step is complete.
Do Not Assume Every Dark Patch Is Removable Buildup
Cabinet tops can change over time.
A surface exposed to years of grease, heat, dust, or sunlight may not look identical after cleaning.
Once the residue has been removed, inspect what remains.
Discoloration may be part of the finish rather than leftover dirt.
Do not continue escalating the cleaner or scrubbing pressure simply because the material does not return to a uniform color.
At that point, the issue may be cosmetic aging or finish condition rather than housekeeping.
Cleaning should stop once the removable buildup is gone.
Be Careful With Cabinet-Top Liners
Some homeowners place removable material above cabinets to make future grease cleanup easier.
That can reduce direct buildup on the cabinet surface, but the liner itself still becomes dirty.
Choose any protective material carefully.
It should not:
- Trap damaging moisture
- Interfere with ventilation
- Create a heat or fire concern
- React with the cabinet finish
- Shed material into the kitchen
A liner does not prevent grease from travelling upward.
It only changes which surface collects it.
If one is used, it still needs to be inspected and replaced or cleaned as appropriate.
Use Cooking Habits to Slow Future Buildup
Cabinet-top grease cannot be eliminated completely, but the rate of accumulation can often be reduced.
Use the range hood according to its instructions.
Cover pans where appropriate.
Use a suitable splatter guard for cooking methods that produce heavy droplets.
Wipe obvious fresh grease around the stove after surfaces have cooled.
Keep hood filters maintained according to manufacturer recommendations.
These habits reduce the amount of oily residue available to travel into the upper part of the kitchen.
They will not make high surfaces maintenance-free, but they can keep the film lighter between cleanings.
Use One Small Test Area as an Early Warning
Cabinet tops do not need constant cleaning.
Instead of waiting until a thick sticky layer is obvious, occasionally check one accessible section.
A small area near the cooking zone can serve as a useful indicator.
If the surface carries only loose dust, the larger cleanup may not be necessary yet.
If it begins feeling tacky, the grease layer is starting to build.
Using one reference point makes it easier to catch the problem earlier without climbing up to inspect every cabinet each week.
The purpose is early detection, not adding another frequent cleaning chore.
Keep Upper-Surface Cleaning on Its Own Rotation
High surfaces generally change more slowly than counters, sinks, and floors.
They do not need to be folded into every kitchen-cleaning session.
A household working with Puget Sound Cleaners can keep cabinet tops, refrigerator tops, elevated shelving, and similar areas on a slower rotation while the frequently used kitchen surfaces remain on their normal schedule.
That approach prevents hidden grease from being forgotten without turning every routine visit into an overhead detail-cleaning project.
The appropriate interval depends on how heavily the kitchen is used and how quickly the reference surfaces become tacky again.
High Surfaces Record What Cooking Sends Into the Air
Kitchen cabinet tops become greasy even though nobody touches them because cooking residue does not remain at countertop height.
Fine oily particles rise and travel through the room. Broad horizontal surfaces collect them. Household dust then sticks to the film, slowly creating the thick coating that makes cabinet tops surprisingly difficult to clean.
Treat the buildup in stages.
Identify where it is heaviest, remove the loose dust, choose a method appropriate for the cabinet material, and give older grease time to loosen without aggressive scrubbing.
Clean the overhead kitchen zone before completing lower surfaces, then use occasional inspections to catch new buildup before it becomes thick.
The cabinet top may be out of sight during everyday cooking, but it quietly records what has been moving through the air below it.



Author Profile

Latest entries
 HomeSeptember 3, 2026Why Kitchen Cabinet Tops Become Greasy Even When Nobody Touches Them
 healthSeptember 2, 20267 Things to Check Before Starting Your Own Skincare Line
 Horse RacingSeptember 2, 2026Expert Horse Racing Picks: A Beginner’s Guide
 TechAugust 28, 2026Why Sports Fans Are Quietly Adding a VPN to Their Game-Day Setup
About the Author